Showing posts with label Excel Service in SharePoint 2013. Show all posts

Friday, December 20, 2013

“The maximum number of allowed sessions per user has been exceeded. This operation cannot be completed” Error in SharePoint Excel services

While working with SharePoint Excel chart and graphs I got an error saying that “The maximum number of allowed sessions per user has been exceeded. This operation cannot be completed” as shown the image below.


We can get this error maximum sessions limit exceeded. By increasing the Maximum Session Per user limit, we can fix this error. We can increase the Maximum Sessions Per User by using the steps below,

Navigate to Application Management page and click on Manage Service Application link in Service Applications section. 


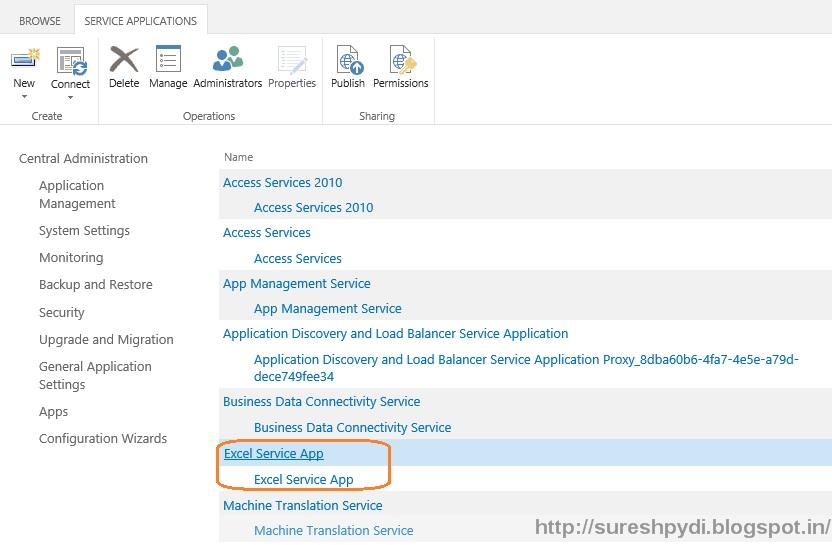
Click on Excel Service application in the list of service applications


 In Manage Excel Services Application page, click on “Global Settings” link


In Excel Services Application Settings page, “Session Management” section, enter Maximum sessions Per User. By default it is 25.  


Tuesday, September 17, 2013

Sharing SQL Server Analysis Service connection using SharePoint 2013 Excel Services

In my previous post, I have explained sharing SQL Server Data source connections in SharePoint 2013. In this post we can use SQL Analysis service connection. We can create Analysis service connection as shown the steps below,

In Excel, Data tab,  click on From Other Sources and select From Analysis Services option.


In Connect to Analysis services, in the Server name box, we have to specify the SQL Server name to get the SQL Server data. Here Iam entering as “.” to connect the local. We have to specify the Log on credentials in the credentials section. To use Windows Authentication, we have to select Use Windows Authentication or to choose SQL Server authentication Select SQL Server Authentication and have to enter the credentials. Click on Next.


“In the Select the database that contains the data that you want” list; we have to select the database that we want to use. If we don’t want to select any database or if there is no databases, uncheck Connect to a specific table.


On Save Data Connection and File and Finish page, we have to enter File Name, Description, Friendly Name, and Search Keywords boxes. In the Authentication settings, we can choose the type of authentication. Click on finish.


Connection will be saved in default location. Once we save the connection, we can upload the connection file Data connections library as shown in my previous post.

Monday, September 16, 2013

Sharing SQL Server Data source connection using SharePoint 2013 Excel Services

We can connect different data sources using excel services includes SharePoint list, access DB, Windows azure etc... All the data connections in excel will support in excel services. We can refresh the data in excel service reports and dashboards and also supports SQL server tables and Analysis services cubes and OLE DB data providers. We can also save the connections to excel services trusted data connection library. It will help us to access the data sources easily without knowing server names and DB names. Excel service workbooks uses in a trusted data library to easy access the current information.

We can use Excel to create and share connections with database. When uploading a data connection to excel services trusted data connection library, data connections will be available to use data models, reports and score cards. Depending on the data source, data will be refreshed easily in excel service workbooks.

To create a SQL server tabular data connection by using excel, we have to follow the steps below,
In Excel Data tab, click on From Other Sources in Get External Data group and we have to select SQL Server.


In Connect to Database Server page, Server name box, we have to specify the SQL Server name to get the SQL Server data. Here Iam entering as “.” to connect the local. We have to specify the Log on credentials in the credentials section. To use Windows Authentication, we have to select Use Windows Authentication or to choose SQL Server authentication Select SQL Server Authentication and have to enter the credentials. Click on Next.


“In the Select the database that contains the data that you want” list, we have to select the database that we want to use, In the Select Database and table page, To create new connection uses single table, we have to select Connect to specific table and we need to select the table to use. By selecting Enable selection of multiple tables, we can select multiple tables.


On Save Data Connection and File and Finish page, we have to enter File Name, Description, Friendly Name, and Search Keywords boxes. In the Authentication settings, we can choose the type of authentication. Click on finish.


On Import Data page, Click on Only Create Connection and Click on OK. 


To Upload Data connections to SharePoint,
Navigate to BI center site and Open Data Connections Library.Click on New Item and click on Browse to choose the file.


If we save the data connections in Default location, in default location, click on libraries, Documents and navigate to My Data Sources.


Select the ODC file that we wanted to upload and click on Open.


In the Add a document dialog box we have to select Content Type as Office Data Connection File. Need to provide details for Name, Title and Description and Keywords, click on Save. 


New data connection will be added as shown below.

Friday, August 30, 2013

Wow that’s big workbook. Unfortunately we can’t open a workbook larger than 10MB. You’ll need to open this in Excel - Large workbook error in SharePoint Excel Services

While working with excel workbooks in SharePoint, I got an error saying that, “Wow that’s big workbook. Unfortunately we can’t open a workbook larger than 10MB. You’ll need to open this in Excel.”


After checking issues into deep, found that the reason for this error is the size of the workbook to be opened is larger than the maximum size of workbook. We can configure the maximum size in the excel services settings.

To change the value, Navigate to Application Management, select Manage Service Applications link.


Select Excel Service application to configure to configure maximum value.


Click on Trusted File Locations in Manage excel service applications page


We’ll be navigated to Excel Services Application Trusted File Locations. Click on specific address we need to configure maximum size.


In Excel Services Application Edit Trusted File Location page, Workbook properties section, we have to specify the Maximum Workbook Size as per our need, click on OK 
button. 


Wednesday, July 24, 2013

“An error occurred during an attempt to establish connection to external data source…” error in SharePoint Excel service PivotTable manual refresh

In SharePoint server 2013, to refresh the data manually in PivotTables need to go for Data -> Refresh All Connections as shown in the image below.


While refreshing data I got an error like “An error occurred during an attempt to establish connection to external data source…” 


After checking the error in Logs I have find that the issue with identity currently set. When we access to refresh the data in PivotTables Claims to windows token service (C2WTS) will be used. If C2WTS is running with domain account that domain account needs permissions on the SharePoint server where it is running.

C2WTS domain account must be in SharePoint server’s local administration group where it is running and it has to impersonate the client after the authentication, Works to log an as service and it needs to be act as part of the operating system.

To access the local security policy of the server, Go to Administrative Tools -> Local Security Policy -> Local Policies -> User Rights Assignments


By adding the permissions to the account that running Claims to windows token service, we need to restart the service on each server it is running. 

Tuesday, July 16, 2013

Add charts to SharePoint site using excel services

By using SharePoint excel services we can show excel worksheets, graphs and charts in the SharePoint site. We can create the charts and graphs by using excel power pivot. To create a chart in excel workbook, take an excel workbook with sample data to create a chart.


Select Insert tab on the top, select Power Pivot button on the top left as shown below.

We can see a window asking to create a Pivot Table. Click on OK button.


Name the Pivot table.


Select the fields to create power pivot report and drag the fields in to Sum values column and Rows column to create a report.


Once done with the report, Select Insert tab and click on the charts to insert the pie chart in excel sheet.


After creating the chart, Name the Chart. Here it is “Chart 1”  


Save the excel sheet and upload it to SharePoint library.


Add Excel Web Access web part in the SharePoint page to show the chart.


Click on the link “Click here to open the tool pane” to specify the worksheet and chart details to the web part.


Add Excel worksheet in Workbook and Chart Name in Named Item in the Workbook display settings of the Excel Web Access web part.


Click on “Apply” button. We can see the Chart in SharePoint page once done with applying the settings.  Click on “OK” button to save the settings. Click on Save Page to save the page.


We have the options to change the view by changing the drop down option on the right side.